Love with 3D Flowers: Enhancing Creativity and Workflow in Embroidery Projects
Embroidery is an art that combines precision, creativity, and technical know-how. Whether you're a seasoned embroiderer or just starting out, the right design can make all the difference in your final product. Love with 3D Flowers is one such machine embroidery design that stands out for its intricate detail, aesthetic appeal, and adaptability across various projects. This design not only adds a touch of elegance but also integrates seamlessly into both personal and professional workflows.
What Is Love with 3D Flowers?
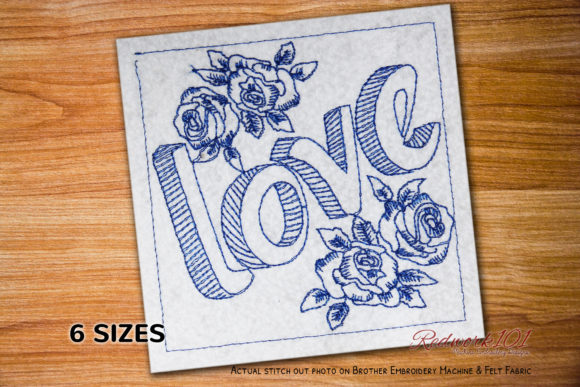
Love with 3D Flowers refers to a machine embroidery design featuring lifelike floral elements rendered in three dimensions. These designs are crafted to give the appearance of depth and realism, making them ideal for adding visual interest to garments, home décor items, accessories, and more. The 3D effect is achieved through layered stitching techniques, which allow each petal and leaf to stand out slightly from the background.
Key Features of the Design
- The Box Stitch, often shown in the design preview, is optional depending on your preference or project requirements.
- The outer box may be in a different color than the main floral elements. If this isn’t part of your intended look, you can easily skip the color using your embroidery machine settings.
- It supports multiple embroidery file formats, ensuring compatibility with a wide range of machines, including popular brands like Janome, Singer, Brother, and Pfaff.
Where Does It Fit in Your Broader Process?
Incorporating Love with 3D Flowers into your creative workflow requires planning at several stages: before, during, and after the actual embroidery process. Understanding how and when to use it can help streamline your work and enhance your results.
Preparation Phase
Before starting any embroidery project, it’s important to assess your tools, materials, and goals. When considering Love with 3D Flowers, ask yourself:
- What kind of fabric am I working with? Thicker fabrics may hold up better to the layered stitches required for a true 3D effect.
- Which embroidery machine do I have? Confirm that your machine supports the file formats provided (such as DST, PES, JEF, HUS, VIP, etc.).
- Do I need additional stabilizers or backing materials to ensure the flowers don’t distort during stitching?
This design works best when planned into the layout early on. For example, if you're designing a wedding dress embellishment, knowing where the 3D flowers will go helps in aligning other elements around them. Similarly, for branding purposes—like customizing promotional bags or apparel—you might want to place the flowers strategically to complement logos or text.
Execution Phase
Once you've selected your design and prepared your materials, the next step is loading and editing the files on your embroidery machine or software. Here's how to proceed smoothly:
- Download the design package and extract the files. Ensure they’re compatible with your machine by checking the format list.
- Open the design in your preferred embroidery software. Adjust colors as needed—remember, the outer box color is optional and can be removed if desired.
- Set up your hoop with the appropriate stabilizer. A tear-away or cut-away stabilizer is recommended for most 3D flower designs due to their complexity.
- Test stitch on a scrap piece of fabric to verify the tension, thread color placement, and overall effect before moving to the final piece.
During this phase, attention to detail is key. Because 3D flowers involve multiple layers, it’s crucial to maintain consistent tension and proper needle type to avoid puckering or distortion. Also, consider the order in which you stitch elements to prevent pulling or shifting.
Post-Production Considerations
After completing the embroidery, take time to inspect the design. Are the petals standing upright? Do the colors match your vision? If adjustments are needed, note them for future reference. For instance, if the 3D flowers appear flat on a certain fabric, you might try a different stabilizer or adjust the stitch density in your software.
When integrating this design into a larger project—such as a quilt block or garment panel—consider how it interacts with surrounding elements. Will the 3D flowers clash with nearby patterns or textures? Will they require trimming or heat setting for durability? Answering these questions ensures a polished end result.
Use Cases Across Industries and Projects
Love with 3D Flowers is versatile enough to fit into many contexts. Below are some practical examples of how professionals and hobbyists can apply this design effectively:
Apparel & Fashion Design
Fashion designers often use 3D floral embroidery to add texture and dimension to clothing lines. Love with 3D Flowers can serve as a central motif on jackets, blouses, or even bridal wear. By embedding this design into your workflow early, you can ensure consistency in style and quality across multiple pieces.
Home Décor & Quilting
Quilters and home décor creators can incorporate this design into pillow covers, wall hangings, or table linens. Its realistic appearance makes it a favorite for spring-themed or romantic aesthetics. Pair it with simpler geometric patterns or monochrome backgrounds to let the 3D flowers shine without overwhelming the design.
Branding & Marketing Materials
Entrepreneurs and marketers looking to personalize products for their audience can use Love with 3D Flowers on tote bags, aprons, or reusable cups. It adds a handmade feel while maintaining the professionalism of branded merchandise. Use it as a signature element to reinforce brand identity across promotional items.
Educational & Workshop Settings
For educators or workshop leaders, this design offers an excellent way to teach advanced embroidery techniques. The layering and optional box stitch provide hands-on learning opportunities for students to experiment with color blocking, stabilizers, and stitch types. Demonstrating how to modify the design—like removing the outer box—can also help users understand customization options.
Integration Tips for Smooth Workflow
To make the most of Love with 3D Flowers, consider the following tips for efficient and effective integration into your routine:
Organize Your Files
Keep your embroidery files well-labeled and categorized. Since this design includes multiple formats, organize them by machine type so you can quickly find the right one when you're ready to stitch. Using folders for “3D Designs,” “Romantic Themes,” or “Spring Projects” can improve long-term usability.
Plan Color Schemes Ahead
Because this design uses multiple colors, especially for the 3D effect, plan your color palette before beginning. Some machines allow you to rearrange or remove colors within the software. Taking advantage of this feature can save time and reduce errors during setup.
Combine with Other Elements
Think about how this design can be paired with other motifs or text. For example, you could stitch a phrase like “Forever in Bloom” alongside the flowers for a cohesive theme. Ensure that the placement doesn’t cause overcrowding and that the design remains legible and balanced.
Use Quality Threads and Needles
High-quality threads and needles are essential for achieving the best results. The 3D effect relies on smooth, tangle-free stitching, so investing in good materials pays off in terms of both appearance and longevity.
Document Your Process
If you're using this design frequently or for clients, keep notes on what worked and what didn’t. Documenting stabilizer types, hoop sizes, and machine settings for each project helps maintain consistency and improves efficiency over time.
Workflow Examples
Here are two real-world scenarios showing how Love with 3D Flowers fits into different workflows:
Custom Wedding Apparel Project
- A designer receives a request for custom embroidered bridesmaid dresses.
- They choose Love with 3D Flowers as the centerpiece due to its elegant and romantic nature.
- Using embroidery software, they adjust the colors to match the wedding theme, removing the outer box if it doesn’t align with the color scheme.
- They test stitch the design on sample fabric and make adjustments based on feedback.
- Once finalized, they prepare the dresses, ensuring each flower is stitched evenly and aligned correctly.
- Finally, they conduct a quality check and deliver the finished products.
Small Business Promotional Items
- An entrepreneur wants to launch a line of eco-friendly tote bags with a floral logo.
- They source Love with 3D Flowers and evaluate how it complements their brand visuals.
- They edit the design in embroidery software to remove the optional box stitch and reassign thread colors to match their logo.
- Each bag is hooped, stabilized, and stitched individually with careful attention to alignment.
- Post-stitching, they trim excess stabilizer and press the design for a clean finish.
- The bags are then packaged and used in marketing campaigns, giving the brand a unique and memorable look.
Long-Term Use and Maintenance
For those who use this design regularly, maintaining a structured approach is vital. Create templates for common applications—like positioning the design on a specific garment or adjusting colors for seasonal themes. Backing up your edited files and keeping track of which versions were used for past projects can streamline future orders.
Also, remember to update your machine firmware and software to support new features or file formats. Staying current ensures smoother operation and reduces compatibility issues when using complex designs like 3D flowers.
Final Thoughts on Practical Application
Love with 3D Flowers is more than just a pretty design—it’s a valuable tool in your creative arsenal. When integrated thoughtfully into your workflow, it enhances the visual impact of your projects while maintaining efficiency and quality. From fashion to branding, educational workshops to home décor, this design adapts to meet a variety of needs.
By understanding its structure, practicing smart preparation, and refining your execution, you can leverage Love with 3D Flowers to elevate your embroidery work. Keep experimenting, document your findings, and watch how this design becomes a staple in your creative process.